Welcome to the first of a series of articles about modern OpenGL. All the code will be open source, and downloadable from github: https://github.com/tomdalling/opengl-series.
By the end of this article, you will have a working OpenGL 3.2 project in Visual Studio 2013 on Windows, and Xcode on OSX. The app will have a vertex shader, a fragment shader, and will display a single triangle using a VAO and a VBO. The project will use GLEW to access the OpenGL API, GLFW to handle window creation and input, and GLM for matrix/vector math.
Yes, it is a little bit boring, but just getting a project set up correctly can be difficult, especially for beginners. Once this is out of the way we will get into the more interesting stuff.
Table of Contents
- Accessing The Code
- A Note On Compatibility
- Visual Studio Setup
- Xcode Setup
- Linux Setup
- Introducing GLEW, GLFW, and GLM
- What Are Shaders?
- What are VBOs and VAOs?
- Explaining The Code
- Future Article Sneak Peek
- Additional Modern OpenGL Resources
Accessing The Code
Download all the code as a zip from here: https://github.com/tomdalling/opengl-series/archive/master.zip
All the code in this series of articles is available from github: https://github.com/tomdalling/opengl-series. You can download a zip of all the files from that page, or you can clone the repository if you are familiar with git.
The code for this article can be found in the
source/01_project_skeleton
folder. On OS X, open the opengl-series.xcodeproj file in the
root folder, and select the target that corresponds with this article. On
Windows, open the opengl-series.sln file in Visual Studio 2013,
and open the project that corresponds with this article.
The project includes all of its dependencies, so you shouldn't have to install or configure anything extra. Please let me know if you have any issues compiling and running the code.
A Note On Compatibility
These articles use OpenGL 3.2, but I will try to keep the code compatible with:
- OpenGL 2.1 for backwards compatibility
- OpenGL 3.X and 4.X for forwards compatibility
- OpenGL ES 2.0 for compatibility with Android and iOS
Because there are so many different versions of OpenGL and GLSL, the code won’t be 100% compatible with all the versions mentioned above. I hope for it to be 99% compatible, requiring only very minor changes when switching between versions.
Too see the differences between the versions of OpenGL and GLSL, good compatibility tables are available here.
Visual Studio Setup
The code was created and tested on Windows 7 32bit, in Visual Studio Express 2013 (which is available for free). You should be able to just open the solution and build all of the projects successfully, but if you can’t then please let me know, or send me a fix and I will update the project.
Xcode Setup
The Xcode project was created and tested on OSX 10.10, in Xcode 6.1. You should be able to open the Xcode project and build all of the targets successfully, without any additional setup steps. Please let me know if the Xcode project does not build successfully for you.
Linux Setup
The linux port of this article was kindly provided by SpartanJ. I tested it quickly on Ubuntu 12.04.
- Install GLM, GLFW, and GLEW with:
sudo aptitude install libglm-dev libglew-dev libglfw-dev - Change into the directory of the project with:
cd platforms/linux/01_project_skeleton - Run the makefile with:
make - Run the executable with:
bin/01_project_skeleton-debug
Introducing GLEW, GLFW, and GLM
Now that you have a working project, let’s start by introducing the open-source libraries that the project uses, and why they are necessary.
The OpenGL Extension Wrangler (GLEW) is what we will be using to give
us access to the OpenGL 3.2 API functions. Unfortunately, accessing OpenGL
functions isn’t as simple as #include <GL/gl.h> unless you want to use an
ancient version of OpenGL. In modern OpenGL, the API functions are determined
at run time, not compile time. GLEW will handle the run time loading of the
OpenGL API.
GLFW will allow us to create a window, and receive mouse and keyboard input in a cross-platform way. OpenGL does not handle window creation or input, so this must be done somewhere else. I chose GLFW over the alternatives because it is very small, and easy to understand.
OpenGL Mathematics (GLM) is a mathematics library that handles vectors
and matrices, amongst other things. Older versions of OpenGL provided functions
like glRotate, glTranslate, and glScale, which would do some of the math
for you. In modern OpenGL, the previously mentioned functions do not exist, and
we must do all of the math ourselves. GLM will help a lot in future articles,
when we start digging into vector and matrix math.
During this series of articles, we will also be making our own small library of
reusable C++ code in the tdogl namespace. This article will include
tdogl::Shader and tdogl::Program, which are used to load, compile, and link
shaders.
What Are Shaders?
Shaders are an important concept in modern OpenGL. The application will not run without them, and the code won’t make much sense unless you understand what they are.
Shaders are little programs, made from GLSL code, that run on the GPU instead of the CPU.
Shaders are little programs, made from GLSL code, that run on the GPU instead of the CPU. They are written in OpenGL Shading Language (GLSL), which looks like C or C++, but it is a different language. The way you make a shader is similar to the way you make a normal program: you write the code, then you compile the code, then you link bits of compiled code together to make the final program.
“Shaders” is not a very good name for them, because they do a lot more than just shading. Just think of them as little programs, written in a different language, that will run on your graphics card.
In older version of OpenGL, shaders were optional. In modern OpenGL, shaders are required in order to get anything to show on the screen.
For a closer look at shaders and the graphics pipeline with nice pictures, I recommend The Graphics Pipeline chapter of the Durian Software series of articles.
| Main Program | Shader Program | |
|---|---|---|
| Language | C++ | GLSL |
| Main function | int main(int, char**); | void main(); |
| Runs on | CPU | GPU |
| Gets compiled? | yes | yes |
| Gets linked? | yes | yes |
So what do shaders actually do? That depends on what type of shader they are.
Vertex Shaders
The main purpose of a vertex shader is to transform points (x, y, and z coordinates) into different points.
The main purpose of a vertex shader is to transform points (x, y, and z coordinates) into different points. A vertex is a is just a point in a shape. One point is called a “vertex”, and multiple points are called “vertices” (pronounced “ver-tuh-seez”). In this article, we have a triangle made of three vertices.
Here is the GLSL code for the vertex shader used in this article:
#version 150

in vec3 vert;

void main() {
    // does not alter the vertices at all
    gl_Position = vec4(vert, 1);
}
The first line #version 150 tells OpenGL that this shader is written in GLSL
version 1.50.
The second line in vec3 vert; says that this shader takes a single vertex as
input, into a variable named vert.
The third line defines a function called main, which is where the shader will
begin running. This is the same as in C, except in GLSL main does not take
any arguments and returns void.
The fourth line gl_Position = vec4(vert, 1); takes the input vertex and sends
it straight to the output without modifying it at all. The variable
gl_Position is a global defined by OpenGL, and is used to store the output of
the vertex shader. All vertex shaders must set the gl_Position variable.
gl_Position is a 4D coordinate (vec4), but vert is a 3D coordinate (vec3),
so we convert vert into a 4D coordinate with vec4(vert, 1). The second
argument, 1, sets the value of the fourth dimension. We will learn more about
4D coordinates in later articles. For now, just know that if the fourth
dimension is 1, then you can ignore the fourth dimension and treat it exactly
the same as a 3D coordinate.
The vertex shader in this article doesn’t actually do anything, but in later articles we will be modifying it to handle animation, cameras, and other things.
Fragment Shaders
The main purpose of a fragment shader is to calculate the color of each pixel that is drawn.
The main purpose of a fragment shader is to calculate the color of each pixel that is drawn.
A “fragment” is basically a pixel, so you can think of fragment shaders as “pixel shaders.” In this article each fragment is a pixel, but this isn’t always true. If you change certain OpenGL settings you can get fragments that are smaller than pixels, but this is a topic for a later article.
Here is the GLSL code for the fragment shader used in this article:
#version 150

out vec4 finalColor;

void main() {
    //set every drawn pixel to white
    finalColor = vec4(1.0, 1.0, 1.0, 1.0);
}
Once again, the first line #version 150 tells OpenGL that this shader is
written in GLSL version 1.50.
The second line out vec4 finalColor; declares an output variable that will
hold the color of the pixel.
The fourth line finalColor = vec4(1.0, 1.0, 1.0, 1.0); sets the output
variable to the color white. The part vec4(1.0, 1.0, 1.0, 1.0) creates an
RGBA color, with the red, green, blue and alpha set to maximum, which means the
color is white.
For now, everything that we draw in OpenGL will be pure white when we use this shader. In later articles, we will add colors and textures. Textures are images that you can put onto your 3D shapes.
Compiling And Linking Shaders
In C++, to make a program you first have to compile all the .cpp files, and
then link them together to make the final program. OpenGL shaders work in the
same way.
The code for this article contains two reusable classes that will handle the
compilation and linking of shaders: tdogl::Shader and tdogl::Program. There
isn’t much code in these two classes, and the code is documented with comments,
so I suggest you read the code to understand how the OpenGL functions work.
What are VBOs and VAOs?
If shaders run on the GPU, and the rest of the C++ code runs on the CPU, you need a way of sending data from the CPU to the GPU. In this article, we are just sending the three points of a triangle, but in a larger project it would be thousands of points of a 3D model, colors, texture coordinates, and other things.
VBOs and VAOs are used to take data from your C++ program and send it through to the shaders for rendering.
This is where we need Vertex Buffer Objects (VBOs) and Vertex Array Objects (VAOs). VBOs and VAOs are used to take data from your C++ program and send it through to the shaders for rendering.
In older versions of OpenGL, this data was sent to the GPU every frame using
functions like glVertex, glTexCoord and glNormal. In modern OpenGL, all
of this data must be sent to the graphics card using VBOs before it is
rendered. Then, when you actually want to render the data, you must set up VAOs
that describe how to pull the data out of the VBOs and feed it into the shader
variables.
Vertex Buffer Objects (VBOs)
VBOs are "buffers" of video memory – just a bunch of bytes containing any kind of binary data you want.
The first step to rendering our triangle is to upload (i.e. send) the three points from normal memory to the video memory on the graphics card. This is what VBOs are for. VBOs are “buffers” of video memory – just a bunch of bytes containing any kind of binary data you want. You can upload 3D points, colors, your music collection, poems to your loved ones – the VBO doesn’t care, because it just copies a chunk of memory without asking what the memory contains.
Vertex Array Objects (VAOs)
The second step to rendering our triangle is to send the points from the VBO into the shaders. Remember how the VBOs are just chunks of data, and have no idea what type of data they contain? Somehow you have to tell OpenGL what type of data is in the buffer, and this is what VAOs are for.
VAOs are the link between the VBOs and the shader variables. VAOs describe what type of data is contained within a VBO, and which shader variables the data should be sent to.
VAOs are the link between the VBOs and the shader variables. VAOs describe what type of data is contained within a VBO, and which shader variables the data should be sent to. Out of all the bad names in OpenGL, I think “Vertex Array Object” is one of the worst, because it doesn’t explain anything about what VAOs actually do.
If you look at the vertex shader we are using (shown earlier in the article),
you will see that we only have one input variable called vert. In this
article, we will use a VAO to say “hey OpenGL, this VBO right here has 3D
points in it, and I want you to send those points to the ‘vert’ variable in the
vertex shader.”
In later articles, we will use VAOs to say “hey OpenGL, this VBO right here has 3D points, some colors, and some texture coordinates all mixed together in a certain pattern. I want you to send the points to the ‘vert’ variable, the colors to the ‘vertColor’ variable, and the texture coordinates to the ‘vertTexCoord’ variable in the shader.”
A note for people with previous experience in OpenGL:
If you have used VBOs without VAOs in older versions of OpenGL, then you
might not agree with this description of VAOs. You could argue that “vertex
attributes” set by glVertexAttribPointer are the link between the VBO and
that shaders, not VAOs. It depends on whether you consider the vertex
attributes to be “inside” the VAO (which I do), or whether they are global
state that is external to the VAO. Using the 3.2 core profile and my ATI
drivers, the VAO is not optional - glEnableVertexAttribArray,
glVertexAttribPointer and glDrawArrays all cause a GL_INVALID_OPERATION
error if there is no VAO bound. This is what leads me to believe that the
vertex attributes are inside the VAO, and not global state. The 3.2 core
profile spec says that VAOs are required, but I hear that only ATI drivers
throw errors if no VAO is bound. Here are some quotes from the OpenGL 3.2 core
profile specification:
All state related to the definition of data used by the vertex processor is encapsulated in a vertex array object.
The currently bound vertex array object is used for all commands which modify vertex array state, such as VertexAttribPointer and EnableVertexAttribArray; all commands which draw from vertex arrays, such as DrawArrays and DrawElements; and all queries of vertex array state (see chapter 6).
However, I can see why vertex attributes could be considered to be external to
VAOs. glVertexAttribPointer predates VAOs, so there was a time when vertex
attributes were just global state. You could see VAOs as just a way to
efficiently change that global state. I prefer to think of it like this: if you
don’t create a VAO, then OpenGL provides a default global VAO. So when you use
glVertexAttribPointer you are still modifying the vertex attributes inside a
VAO, it’s just that you’re modifying the default VAO instead of one you created
yourself.
There is a bit more of a discussion here: http://www.opengl.org/discussion_boards/showthread.php/174577-Questions-on-VAOs
Explaining The Code
Finally! The theory lesson is over and we can start digging into the code. OpenGL is not very beginner-friendly, but if you understand the concepts that have been explained so far in this article (shaders, VBOs, and VAOs) then you are doing well.
Open the file main.cpp, and we will walk through the code
starting at the main() function.
First, we initialise GLFW:
glfwSetErrorCallback(OnError);
if(!glfwInit())
    throw std::runtime_error("glfwInit failed");
The glfwSetErrorCallback(OnError) line tells GLFW to call the OnError
function whenever an error occurs. The OnError function throws an exception
that contains the error message, so we can see what went wrong.
Next, we use GLFW to create a window:
glfwWindowHint(GLFW_OPENGL_FORWARD_COMPAT, GL_TRUE);
glfwWindowHint(GLFW_OPENGL_PROFILE, GLFW_OPENGL_CORE_PROFILE);
glfwWindowHint(GLFW_CONTEXT_VERSION_MAJOR, 3);
glfwWindowHint(GLFW_CONTEXT_VERSION_MINOR, 2);
glfwWindowHint(GLFW_RESIZABLE, GL_FALSE);
gWindow = glfwCreateWindow((int)SCREEN_SIZE.x, (int)SCREEN_SIZE.y, "OpenGL Tutorial", NULL, NULL);
if(!gWindow)
    throw std::runtime_error("glfwCreateWindow failed. Can your hardware handle OpenGL 3.2?");
The window contains a forward-compatible OpenGL 3.2 core profile context. If
glfwCreateWindow is failing for you, then you may need to lower the OpenGL
version.
As the last step of window creation, we have to set the “current” OpenGL context to the one in the window we just created:
glfwMakeContextCurrent(gWindow);
Whenever we call an OpenGL function, that function affects the “current context.” We will only be using a single context, so we set this once and forget about it. Theoretically, however, we could have multiple windows, and each window would have its own context.
Now that we have an OpenGL context available in our window, we initialise GLEW so that we get access to the OpenGL API functions.
glewExperimental = GL_TRUE; //stops glew crashing on OSX :-/
if(glewInit() != GLEW_OK)
    throw std::runtime_error("glewInit failed");
As of writing this, GLEW has a few issues with the OpenGL core profile we are
using. Setting glewExperimental to true fixes the problem, but hopefully this
won’t be necessary in the future.
We will also use GLEW to double-check that the 3.2 API is available:
if(!GLEW_VERSION_3_2)
    throw std::runtime_error("OpenGL 3.2 API is not available.");
Inside the LoadShaders function, we compile and link a vertex shader and a
fragment shader using the tdogl::Shader and tdogl::Program classes provided
with this article.
std::vector<tdogl::Shader> shaders;
shaders.push_back(tdogl::Shader::shaderFromFile(ResourcePath("vertex-shader.txt"), GL_VERTEX_SHADER));
shaders.push_back(tdogl::Shader::shaderFromFile(ResourcePath("fragment-shader.txt"), GL_FRAGMENT_SHADER));
gProgram = new tdogl::Program(shaders);
Inside the LoadTriangle function, we are going to make one VBO and one VAO.
The first step is to create and bind the a new VAO:
glGenVertexArrays(1, &gVAO);
glBindVertexArray(gVAO);
Then we create and bind a new VBO:
glGenBuffers(1, &gVBO);
glBindBuffer(GL_ARRAY_BUFFER, gVBO);
Next, we upload some data into the new VBO. The data is going to be three
points, where each point is three GLfloats.
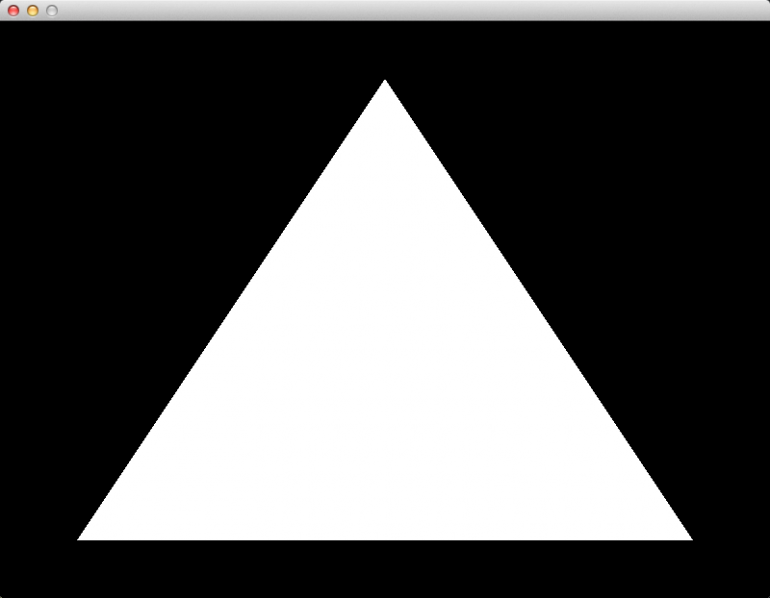
GLfloat vertexData[] = {
    //  X     Y     Z
     0.0f, 0.8f, 0.0f,
    -0.8f,-0.8f, 0.0f,
     0.8f,-0.8f, 0.0f,
};
glBufferData(GL_ARRAY_BUFFER, sizeof(vertexData), vertexData, GL_STATIC_DRAW);
Now that the buffer contains the three points of our triangle, it is time to
set up the VAO. First, we are going to enable the vert variable in the shader
program. Variables can be enabled and disabled, and they are disabled by
default, so we need to turn it on. The vert variable is an “attribute
variable,” which is why the OpenGL functions have the word “Attrib” in their
name. We will see a different type of variable in future articles.
glEnableVertexAttribArray(gProgram->attrib("vert"));
The most complicated part of VAO setup is this next function:
glVertexAttribPointer. Let’s see the function call first, then I will explain
each argument.
glVertexAttribPointer(gProgram->attrib("vert"), 3, GL_FLOAT, GL_FALSE, 0, NULL);
The first argument, gProgram->attrib("vert"), is the shader variable that the
data should be sent to. In this case, we want to send the data to the vert
variable of our shader.
The second argument, 3, says that each vertex has three numbers.
The third argument, GL_FLOAT, says that the three numbers are GLfloats.
This is important because if they were GLdoubles then the size of the data
would be different.
The fourth argument, GL_FALSE, says that we do not want the floats to be
“normalized.” If they were normalized, they would be restricted to having a
minimum of zero, and a maximum of one. We don’t want that restriction on our
points, which is why this argument is false.
The fifth argument, 0, would be used if there was a gap in between each
point. Setting this argument to zero means that there are no gaps in our data.
The sixth argument, NULL, would be used if our data was not at the start of
the buffer. Setting this argument to NULL means that our data starts right at
the first byte of the VBO.
Now that the VBO and VAO are fully set up, we unbind them so they don’t accidentally get used somewhere else:
glBindBuffer(GL_ARRAY_BUFFER, 0);
glBindVertexArray(0);
At this point, the shaders, VBO, and VAO are ready for use. All we have to do
now is draw them inside the Render function.
First we clear the screen so that it is completely black:
glClearColor(0, 0, 0, 1); // black
glClear(GL_COLOR_BUFFER_BIT | GL_DEPTH_BUFFER_BIT);
Next we tell OpenGL that we want to start using our shaders and our VAO:
glUseProgram(gProgram->object());
glBindVertexArray(gVAO);
At last, we can draw that ever-elusive triangle:
glDrawArrays(GL_TRIANGLES, 0, 3);
This call to glDrawArrays says that we want to draw triangles, starting at
vertex zero, and ending after three vertices have been sent to the shader. It
will look at the currently bound VAO to determine where to get the vertices
from.
The vertices will be pulled out of the VBO and sent to the vertex shader. Then each pixel within the triangle will be sent to the fragment shader. Then, the fragment shader will make each pixel white. Hooray!
The drawing is finished now, so we unbind the shaders and the VAO just to be safe:
glBindVertexArray(0);
glUseProgram(0);
The last thing that needs to be done before we can see the triangle is to swap the frame buffers:
glfwSwapBuffers(gWindow);
Before the frame buffers were swapped, we were drawing to an off-screen frame
buffer that was not visible in the window we created at the start. When we call
glfwSwapBuffers the off-screen buffer becomes an on-screen buffer, so that we
can see it in the window.
Future Article Sneak Peek
In the next article we will texture the triangle with an image. In the article after that we will learn a bit about matrix transformation, and use it in the vertex shader to make a cube spin in 3D.
After that, we will start creating a 3D scene with a camera and multiple objects.
Additional Modern OpenGL Resources
Unfortunately, I had to skim over a lot of topics in order to stop this article from becoming the size of a textbook. Quench your thirst for knowledge with these fine modern OpenGL resources:
- An intro to modern OpenGL by Joe Groff of Durian Software
- Learning Modern 3D Graphics Programming by Jason L. McKesson
- A collection of simple single file OpenGL examples by Jakob Progsch
- OpenGL Step by Step by Etay Meiri
- All about OpenGL ES 2.x by Diney Bomfim
- The OpenGL Progamming book on Wikibooks
- Tutorials on the OpenGL wiki
- OpenGL 4 tutorials by Donald Urquhart (Swiftless)
- open.gl by Alexander Overvoorde
- OpenGLBook.com by Eddy Luten
- The official OpenGL SDK documentation
- Compatibility tables for OpenGL, OpenGL ES, GLSL, and GLSL ES by Sugih Jamin